User Interface Testing with TestFX


Introduction
In this guide I show how TestFX can be used to automate the testing of an application with a JavaFX user interface. The article is based on the real-world experience of automating the tests for VocabHunter. All of the code is Open Source and GitHub links are provided so that you can follow along. I hope that you will find ideas here that you can adapt to your own project. If you want to fork the repository, you can find it in GitHub here.
User Interface testing, like all good technical challenges, is a problem with more than one solution. The solution presented here is one that has been refined over the past few years of work on VocabHunter and continues to evolve as the project development work continues.
TestFX
TestFX is a framework for use in automating JavaFX Graphical User Interface (GUI) tests. This article is based on version 4 of TestFX (at the time of writing the latest version) with JUnit 5.
The TestFX framework gives you programmatic control of a “robot” that you can use to click on buttons, type into text boxes and generally operate your JavaFX user interface. It is driven through a fluent API and includes useful matchers for validating the results of your test.
Just to get an idea of what this looks like, here are a few lines from the VocabHunter GUI test:
robot.clickOn("#buttonNew");
verifyThat("#mainWordPane", isVisible());
verifyThat("#mainWord", hasText("and"));
Here I instruct the robot to click on the “New” button on the user interface and then verify that afterwards a particular component is visible and that the word “and” has been selected. I hope that you can see from this that the tests can be quite readable and expressive.
Although the VocabHunter GUI test is based on JUnit 5, TestFX works equally well with the older and still more widely used JUnit 4. Until recently VocabHunter also used this older version of the testing framework and you can read all about what was required to make the change in VocabHunter in my article Migrating to JUnit 5.
VocabHunter
First things first, this is an article about using TestFX and as such you don’t need to know about or use VocabHunter to follow this guide. I will try to give all of the necessary context and links to code so that you can follow along with the techniques I describe. The article is intended to be a real example of TestFX in use and I think that you will find that the VocabHunter GUI test provides a useful, self-contained example.
If however this article leaves you wanting to know more about the VocabHunter project, you can find all you need to know by visiting the project website. VocabHunter is an Open Source tool for learners of foreign languages. It allows users to examine for example novels and classify the vocabulary into known words and unknown words that need to be studied. In addition to the project website, if you are interested take a look at the article I wrote for the King Tech Blog: How JavaFX was used to build a desktop application. To stay up to date on the project, follow @vocabhunterapp on Twitter.
VocabHunter is in active development and as such classes will change over time. For that reason I have fixed all of the links here to a specific tagged release in GitHub, version 1.0.23. That way the links will continue working even if the underlying codebase changes.
The GUI Walkthrough
The VocabHunter GUI test is a walkthrough of a simple session using the program. You can see the test in action in this video:

Even better, you can try it out for yourself! Clone the GitHub repository and run the following command (use gradlew.bat instead of ./gradlew if you are using Windows):
./gradlew :gui:test --tests io.github.vocabhunter.gui.main.GuiTest \
  --rerun-tasks -PnoHeadless
The test is structured as a series of very simple named steps. The usual form of each step is:
- Perform an action, for example click a button to classify a word.
- Validate the new state, for example check that a new word is shown on the main display, awaiting classification.
To make this concrete, let’s take a look at the first three steps in the GUI test.
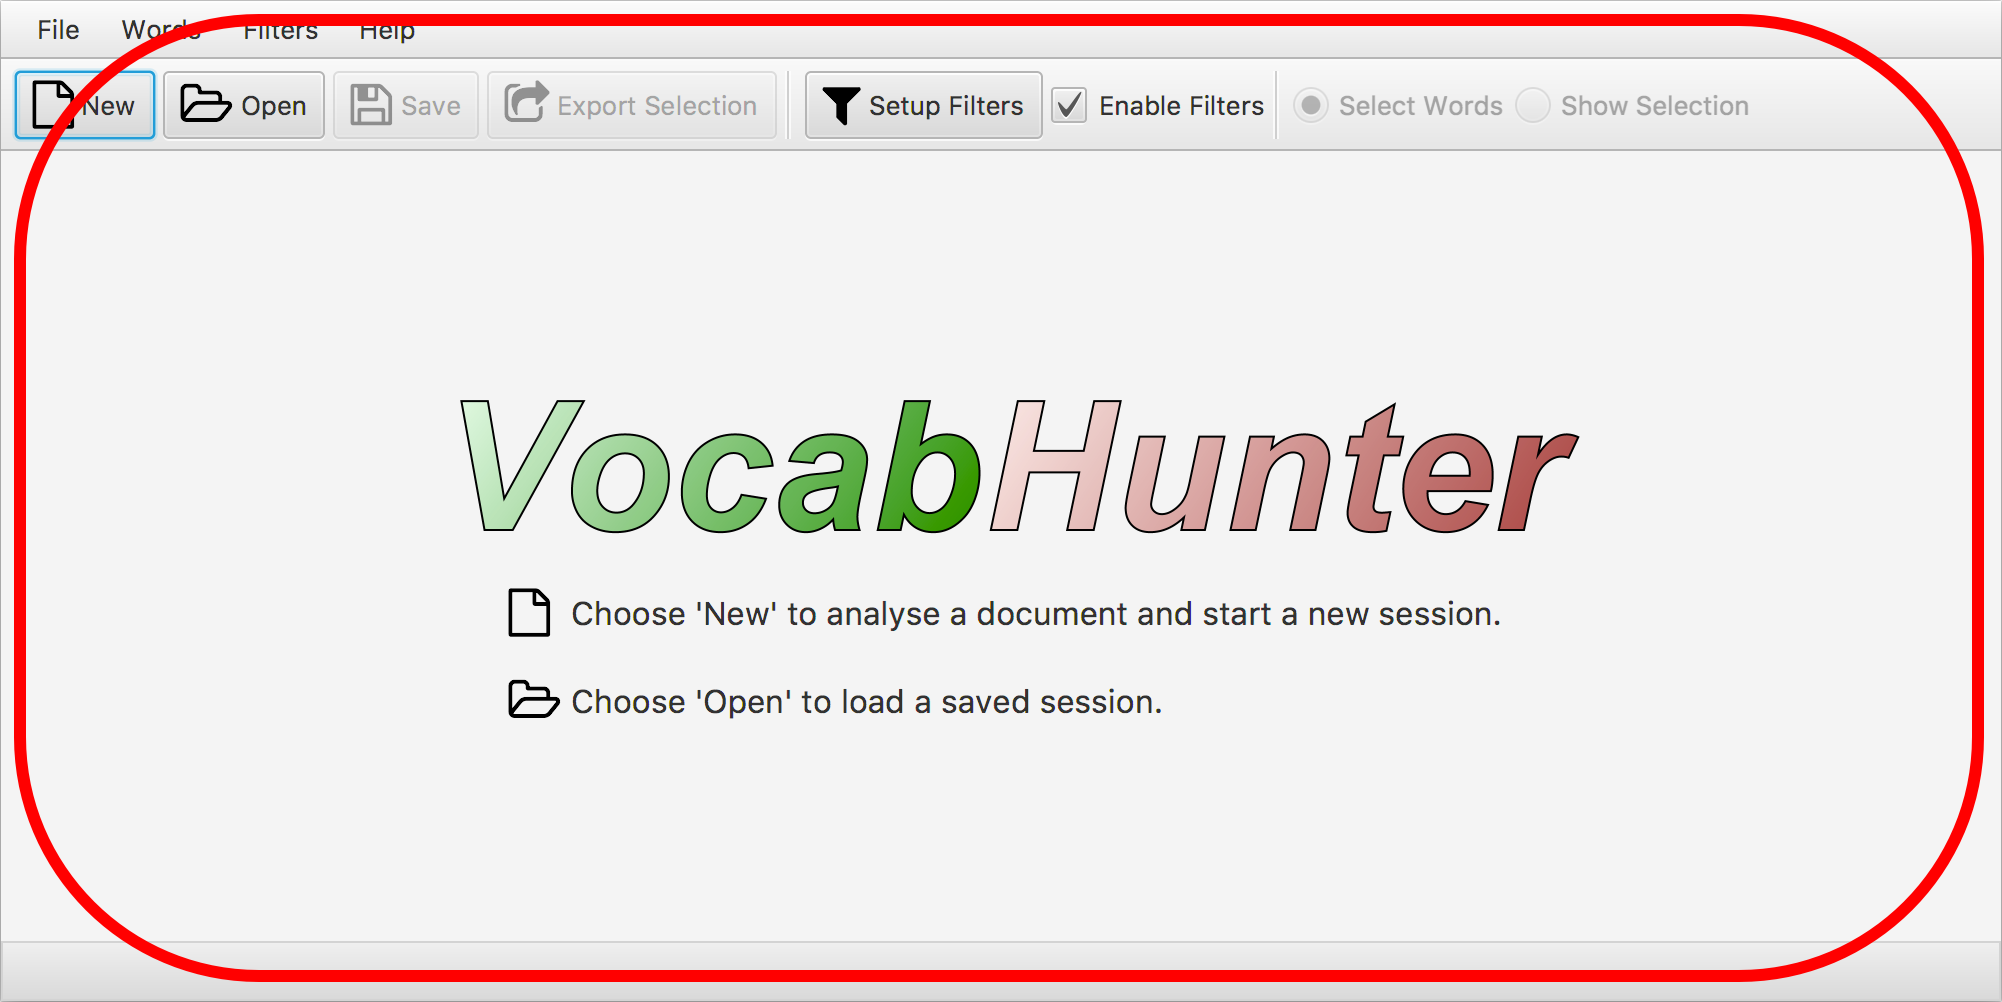
Step 1: “Open application”
Action - None.
Validation - Check that the main pane is visible (highlighted in the screenshot below with the red box). This is a good proxy for checking that the system has started up:
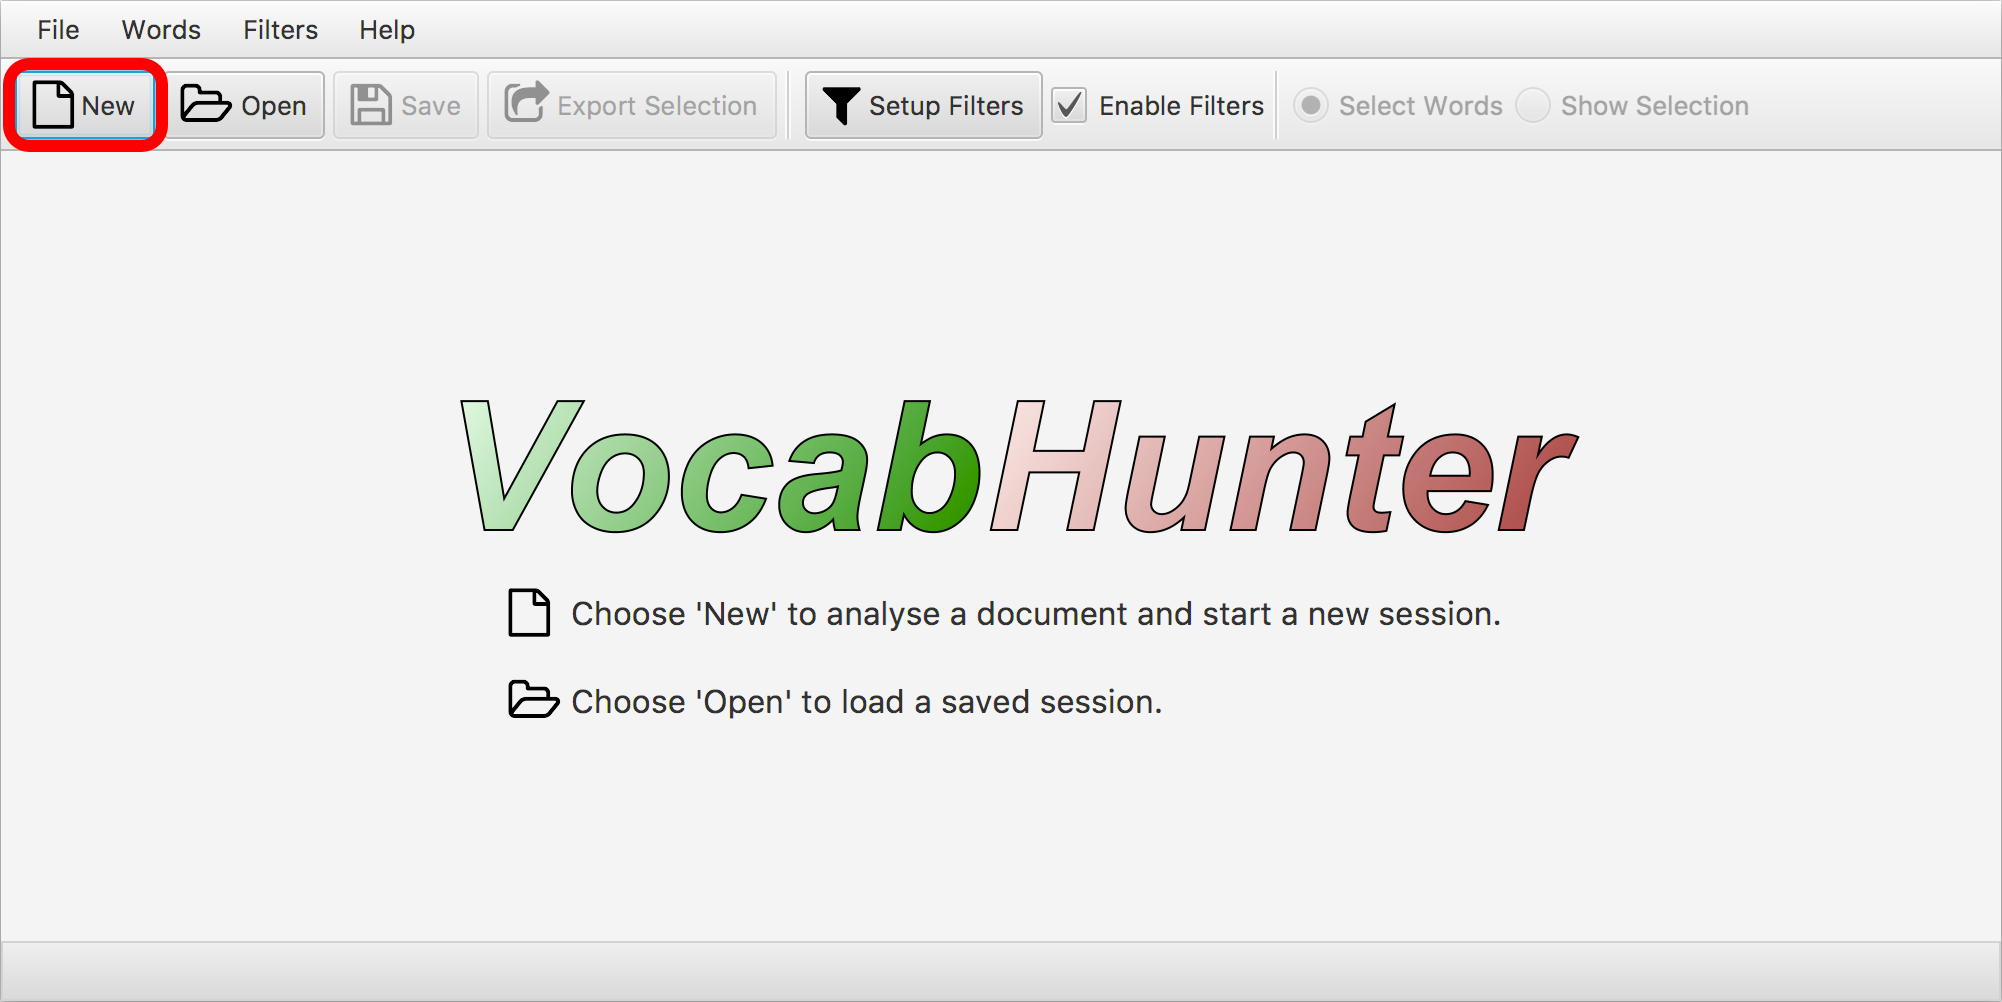
Step 2: “Start new session”
Action - Click on the “New” button (highlighted in red) to start a new session:
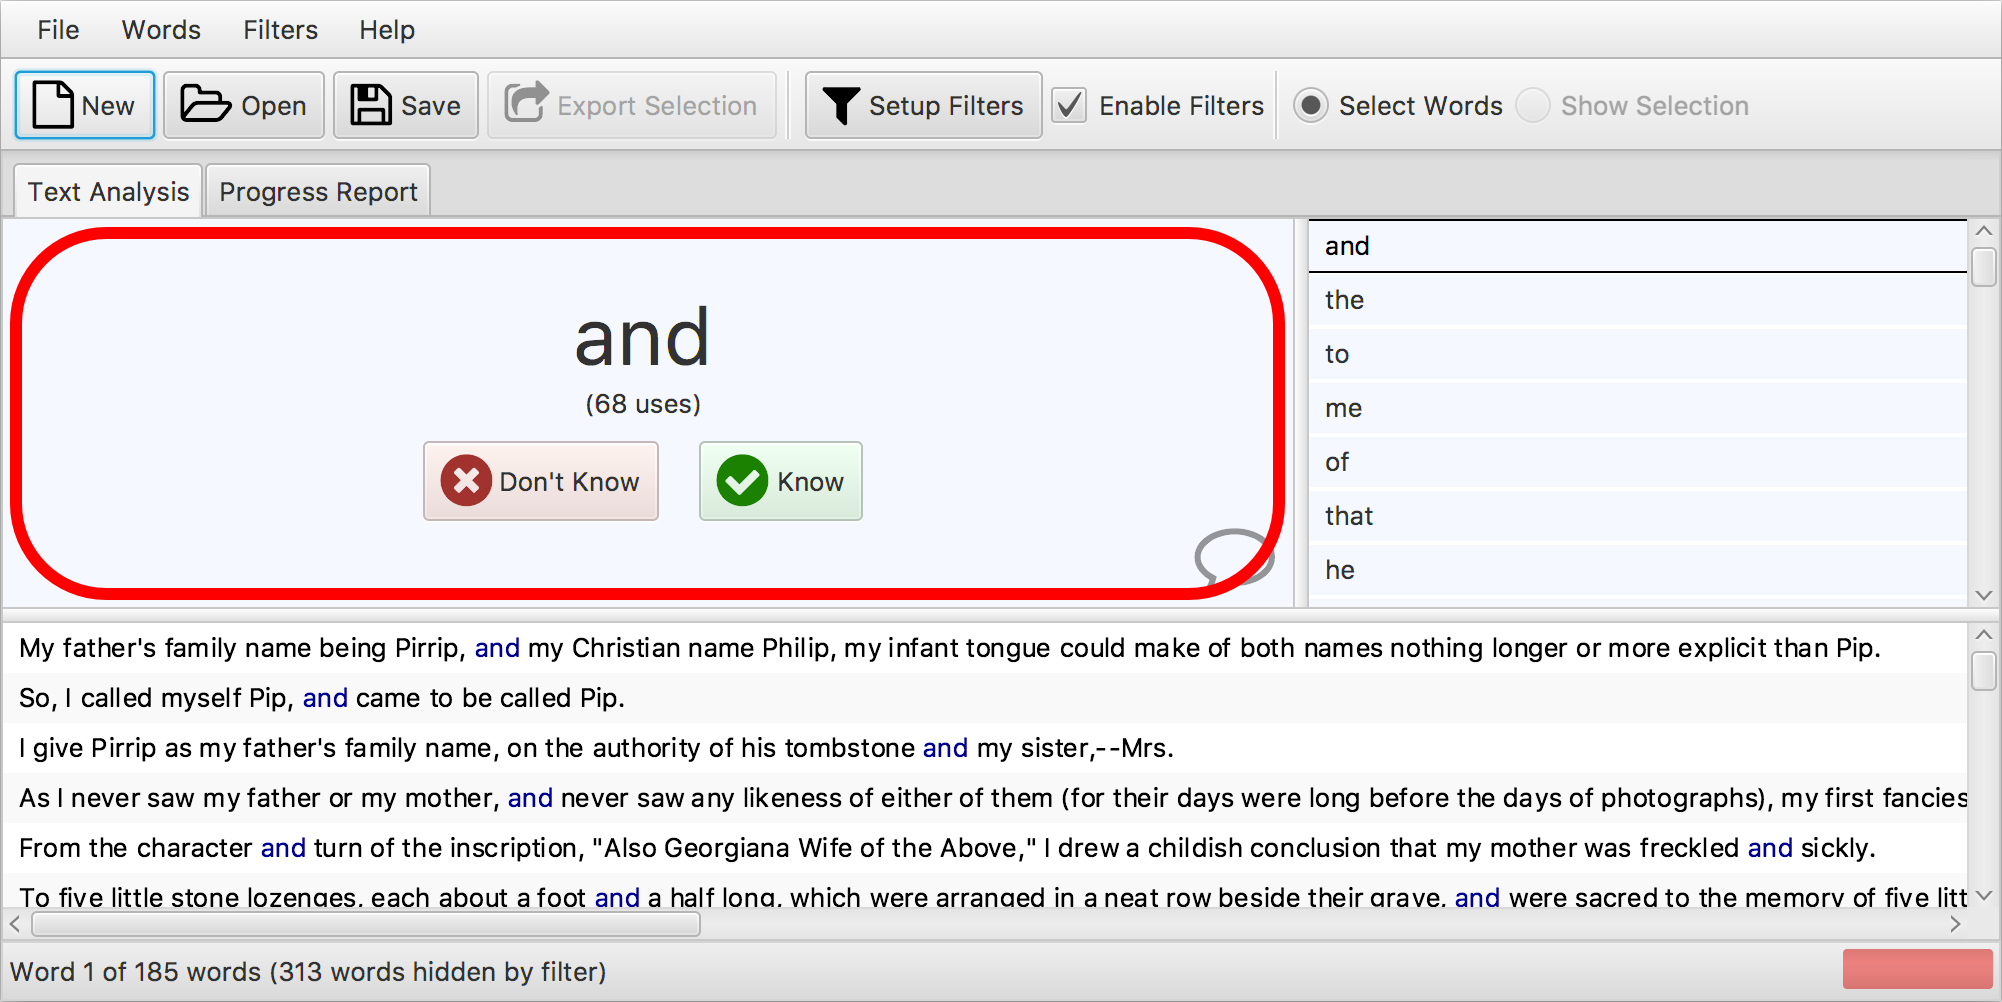
Validation - Check that the word classification pane is visible (highlighted below) and that the word shown is “and”:
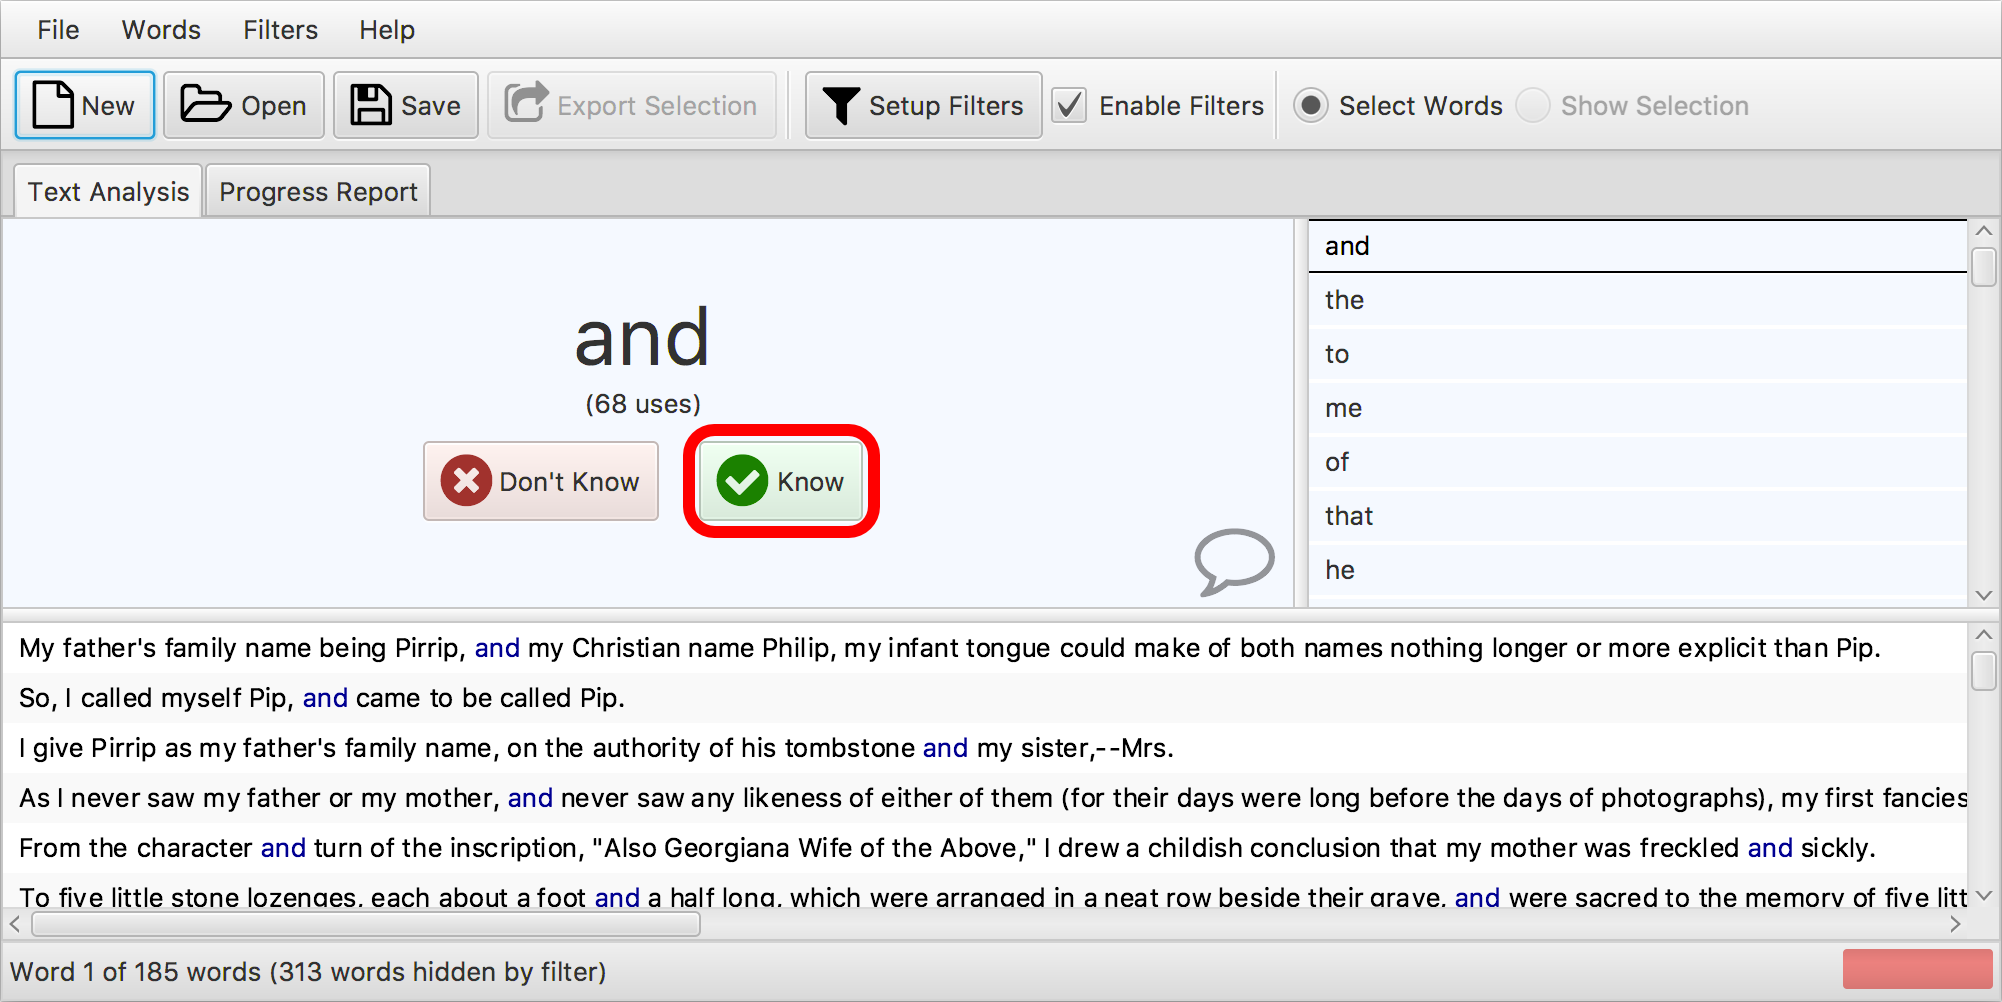
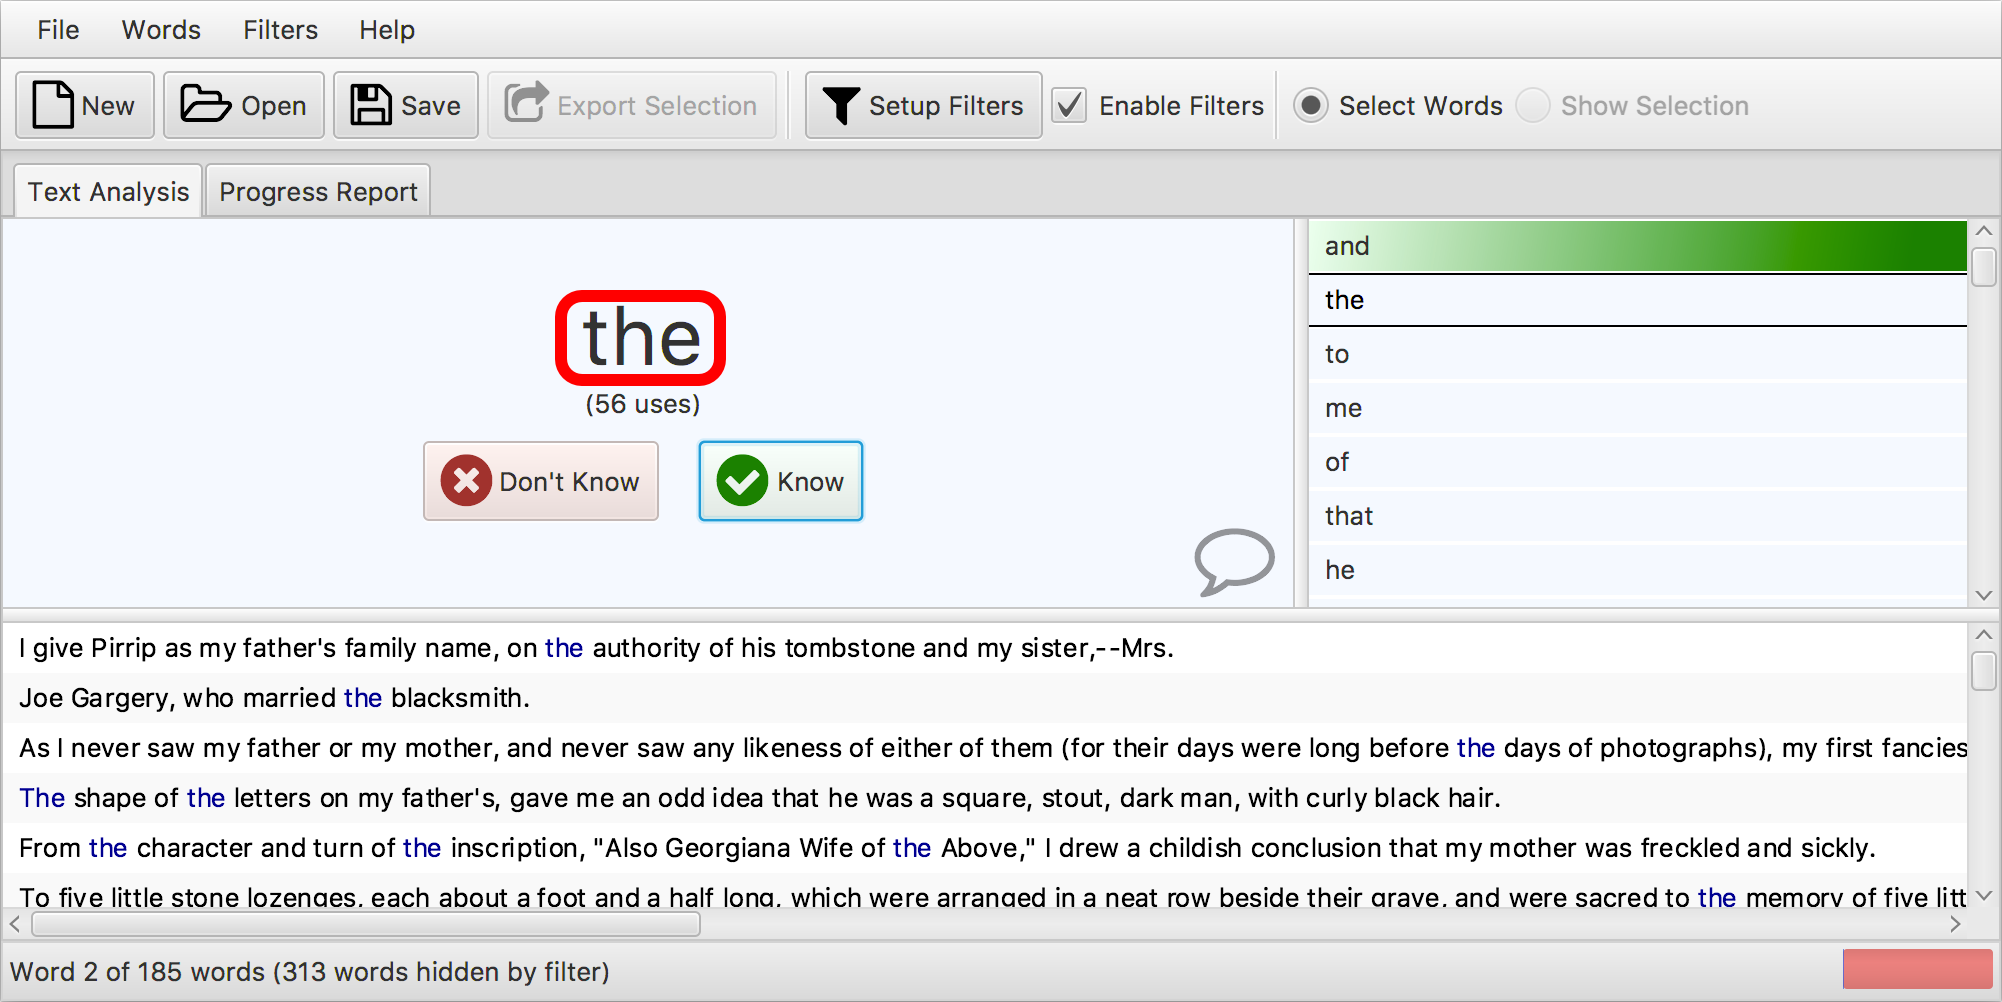
Step 3: “Mark word as known”
Action - Click the “Know” button (highlighted) to classify a word as known by the user:
Validation - Check that the new word “the” (highlighted) is shown to be classified.
The above is just a description of the first three steps but I think that it gives an idea of what we are doing in the GUI walkthrough.
Automated GUI Testing
Automated GUI Tests are a great tool for helping to ensure the quality of a project. But GUI testing is no substitute for unit tests! VocabHunter includes a comprehensive set of unit tests where individual parts of the system are isolated and tested, trying out a range of different possibilities and edge cases. Automated GUI tests are complementary to rather than an alternative to unit tests. If a problem is identified at both levels, GUI test and unit test, it is usually far easier to track the problem down through the unit test as there are fewer “moving parts” involved.
A good unit test isolates the code under test and lets you stop and debug just that component. That said, automated GUI tests are great as they provide a way to put everything together and see that it functions as a whole as expected. Furthermore, certain components of the user interface can be difficult to test meaningfully in unit tests and automated GUI tests help a great deal here too. My personal experience with my work on VocabHunter has been that the GUI test has caught several problems before they became bugs in the system. I feel that the time put into both the unit tests and the GUI test has been time well invested!
The steps in the VocabHunter automated GUI test are always performed in the same order. The test is predictable: we know what the system state should be after each step. Each individual step transforms the state in some way, for example clicking the “Open” button opens a saved session that forms part of the new state. The next step is then based on the new state from the previous step. This makes things a little different from unit tests. All of the unit tests in VocabHunter are developed to be entirely self-contained and as such can be executed in any order as well as individually in isolation. By contrast the steps in the GUI test are order-dependent. For this reason you will see that there is just one entry point GuiTest.testWalkThrough() for the GUI test which runs all of the steps in order and this, or course, is self-contained.
Each step in the GUI test is defined with a single call to the method step(). This method runs the body of the step but also adds some extra logging to give the step number and the name of the step. I’ve found that this logging can be really useful when you’re trying to find out where the GUI test has failed. This is of particular concern when running headless tests (see later in this article for more on headless tests). The definition of the step() method is therefore very simple:
private void step(final String step, final Runnable runnable) {
    ++stepNo;
    LOG.info("STEP {}: Begin - {}", stepNo, step);
    runnable.run();
    LOG.info("STEP {}:   End - {}", stepNo, step);
}
The method is then called for each and every step in the walkthrough with two parameters: a step name and a Java 8 lambda with the action and validation performed in the step:
step("Start new session", () -> {
    robot.clickOn("#buttonNew");
    verifyThat("#mainWordPane", isVisible());
    verifyThat("#mainWord", hasText("and"));
});
Using TestFX
You’ve actually already seen the most important parts of the way that TestFX is used in the VocabHunter GUI test in the first code snippet I presented in this article:
robot.clickOn("#buttonNew");
verifyThat("#mainWordPane", isVisible());
verifyThat("#mainWord", hasText("and"));
Beyond these basics, there are some “administrative bits and pieces” that we need to cover here. I will explain what I did to set up the test although it is worth bearing in mind that as ever there is more than one way to do this and you may well find a technique that works better for you.
The first thing to note is that GuiTest, the main test class, extends the TestFX class FxRobot. There are then two setup methods for the class: setupSpec() marked with @BeforeAll and setUp() marked with @BeforeEach. These JUnit 5 annotations are the respective equivalents of the JUnit 4 annotations @BeforeClass and @Before. Taking these in turn and simplifying we have the first of the two as follows:
@BeforeAll
public static void setupSpec() throws Exception {
    // Set up JavaFX system
    // ....

    registerPrimaryStage();
}
The comment “Set up JavaFX system” replaces the code that does just that. This is where we can run any code that we need to run before we initialise JavaFX. In my case I use it to set up some system properties that control “headless” testing (see later in this article for more detail). The call to registerPrimaryStage() (a TestFX method) then gets the ball rolling and initialises JavaFX for us.
The second setup method is setUp():
@BeforeEach
public void setUp() throws Exception {
    // Prepare the application for testing
    // ...

    setupApplication(VocabHunterGuiExecutable.class);
}
Again to simplify, the detail of the VocabHunter test setup is elided here but basically where I’ve added the comment “Prepare the application for testing” the actual code prepares everything we need for the test before the application is instantiated. This includes creating mocks for various bits and pieces (more on this later) and forcing a standard window size. Your test will inevitably contain different specific setup but the principle is the same. Finally, there is the call to setupApplication(). This is a TestFX method that instantiates the application under test and takes control of it. As you can see I pass it the parameter VocabHunterGuiExecutable.class so that it knows the application that we are testing. And that’s it for the setup!
As is common for JavaFX applications, the view part of the VocabHunter GUI is defined using FXML. Each element of the view that is used elsewhere has an fx:id associated with it so that it can be uniquely identified. Take for example the following snippet of code from session.fxml:
<Label fx:id="mainWord" styleClass="mainWord"
       text="Main Word" />
<Label fx:id="useCountLabel" styleClass="useCount"
       text="(110 uses)" />
Here you can see two JavaFX label components, both with an fx:id: fx:id="mainWord" and fx:id="useCountLabel". mainWord is the word that the user is analysing and useCountLabel is the number of times that the word appears in the document under analysis. These identifiers are used by JavaFX when injecting the view elements into the controllers. In the case of these two identifiers, take a look at SessionController to see this in action. These handy identifiers can also be used in both actions and validations by TestFX. We just take the identifier and prefix it with a # symbol. The following line from the GUI test shows this in action for the mainWord element:
verifyThat("#mainWord", hasText("and"));
Problems and Solutions
The VocabHunter GUI test has evolved and continues to evolve with the project itself. During this process I’ve hit various problems and discovered solutions and some of these might be applicable too in your own situation.
The first of these problems is a general one that applies to most projects of any size. Put simply there are parts of the system that are best excluded from the automated GUI tests. Generally you want to integrate as much as you can sensibly in the test but this is sometimes not feasible when external systems are involved.
In the case of VocabHunter, a good example of this is the web browser. VocabHunter is a stand-alone JavaFX desktop application. It doesn’t run in the browser. However, there are menu options to take the user to help pages and selecting one of these options launches the web browser pointing to the appropriate page. I want to validate this functionality in the GUI test but I prefer not to complicate the test by including the web browser. So what I have done in this case is to isolate the functionality for opening the browser on a particular page in the interface WebPageTool. In the “real” VocabHunter this is implemented by the class WebPageToolImpl but in the GUI test I use a mock as a stand in. This technique is great as I can then verify the URL that is passed by VocabHunter to the WebPageTool. I use the excellent Mockito to provide the mocks themselves. For this reason you will see the following at the top of GuiTest:
@BeforeEach
public void initMocks() {
    MockitoAnnotations.initMocks(this);
}
and then to define the WebPageTool:
@Mock
private WebPageTool webPageTool;
VocabHunter uses the file dialogues provided by the operating system. When the user opens a file on a Mac they see a standard Apple dialogue but on Windows they will see something that they are familiar with from Microsoft. From a user point of view this is good news but it makes things a little harder for automated GUI tests. Although this component is created using the JavaFX FileChooser class, the underlying dialogue is controlled by the operating system and hence the TestFX robot doesn’t have access to it. Again Mockito rides to the rescue here. The FileDialogueFactory defines the functionality, FileDialogueFactoryImpl is used for the real application and a mock is used in the test. This works really nicely and it means that, for example, I can have the robot click the “Open” button and then through the mock provide exactly the file that I want to use in the test.
Just like the native file dialogues, VocabHunter also uses the system menu bars. On Windows it is normal to see a menu bar within a window whereas on a Mac it is shown at the top of the screen. This provides for the most familiar experience for the user but can be problematic when automating the GUI tests. If the GUI test is run on a Mac with the native menu bar, the TestFX robot is unable to click on the menus. Fortunately, JavaFX lets us switch this functionality with a call to MenuBar.setUseSystemMenuBar() and this is what happens in the GUI test, again through the magic of Mockito.
One final problem worth mentioning relates to screen size. VocabHunter makes a call to JavaFX to get the screen size and then uses this to size the window. This presents two problems for the GUI test:
- The test then behaves differently on different machines, depending of the screen resolution of the test machine.
- When running in “headless mode” with no display at all, the screen size might not be what you expect.
After reading the previous problems and solutions, I’m sure you can guess the solution to this. Again, the test uses a mock that forces the apparent screen size to avoid the call to get the real screen size and hence avoid the differing behaviour on different machines. EnvironmentManager.getScreenSize() handles this.
Dependency Injection
In the previous section I made reference to Mockito mocks being used in the GUI test. But how do we get the mocks in there? The answer is that it is done through Dependency Injection. VocabHunter uses Gluon Ignite with Google Guice for dependency injection and this also works well with the GUI test.
Guice uses a simple system of modules and everything is configured in Java code with no special XML files. Aside from a small module for external events, there are two main Guice modules that make up VocabHunter:
CoreGuiModule- This defines the components that are shared by both the “real” VocabHunter and the version that is built for the GUI test.LiveGuiModule- This is where the remaining components for the “real” VocabHunter are defined. These are the components that aren’t used in the test. Instead, mocks are injected into the GUI test, as described in the previous section. This module is therefore excluded in the GUI test and instead a test module is constructed containing the mocks.
You can read more about how all this works in VocabHunter in the article Dependency Injection in JavaFX.
Headless Testing
When you’ve been working for a while on a project as I have been on VocabHunter, there’s something rather magical about watching the TestFX robot automatically working its way through the GUI test. You start it off and it runs quickly and methodically through your programmed set of steps and verifies that all is as it should be. Being able to actually see the user interface is also very useful when developing the test itself and when resolving problems using the debugger.
However, we hit problems if the tests always run like this. If the automated GUI test is included as a part of the standard build as is the case in VocabHunter then it can be problematic if a robot takes over your display every time you run a build. To be useful the tests need to be as unobtrusive as possible. Furthermore, if you are working with a continuous integration system it is often not possible to run tests like this that require a display.
This is solved in the VocabHunter GUI test by offering the option to run the tests in “headless” mode. When run like this, tests use a simulated display and so the user doesn’t actually see anything. Furthermore the tests run without problems like this in TravisCI, the continuous integration system that I use for VocabHunter. By default the build will run the GUI test in headless mode but running the same test in the IDE switches off headless mode. These seem to me like sensible defaults but in both cases they can be overridden with a build switch or a system property respectively.
To run the tests in headless mode, I use Monocle from the OpenJDK. In the build.gradle script, the following is added to switch on headless mode by default for the Gradle build (with the option to switch it off from the Gradle command line using the -PnoHeadless option):
if (!project.hasProperty("noHeadless")) {
    jvmArgs "-Dheadless=true"
}
Finally in the test class itself, GuiTest, we add the following in the @BeforeClass section, before the TestFX initialisation call registerPrimaryStage():
if (Boolean.getBoolean("headless")) {
    System.setProperty("testfx.robot", "glass");
    System.setProperty("testfx.headless", "true");
    System.setProperty("prism.order", "sw");
    System.setProperty("prism.text", "t2k");
    System.setProperty("java.awt.headless", "true");
}
All of this seems to work very nicely and means that it is perfectly possible to run the automated GUI test for every VocabHunter build. This all runs in TravisCI as well. The details of the TravisCI setup are beyond the scope of this article but if you’re interested, take a look at the configuration file .travis.yml and the VocabHunter continuous integration job.
Gradle Dependencies
VocabHunter is built using Gradle, currently for Java 8. The build script includes two main dependencies for the GUI test: TestFX itself and Monocle which is used for the headless tests. This gives the basic Gradle dependencies as follows:
testCompile 'org.testfx:testfx-core:4.0.12-alpha'
testRuntime 'org.testfx:openjfx-monocle:8u76-b04'
I’m working on support for Java 9 in VocabHunter and to support this new version of Java, the TestFX and Monocle dependecies need to be changed:
testCompile('org.testfx:testfx-core:4.0.12-alpha') {
    exclude group: 'org.testfx',
            module: 'testfx-internal-java8'
}
testRuntime 'org.testfx:testfx-internal-java9:4.0.12-alpha'
testRuntime 'org.testfx:openjfx-monocle:jdk-9+181'
The build.gradle file for VocabHunter contains the following which combines both of the above and thus supports both Java 8 and Java 9:
if (JavaVersion.current() == JavaVersion.VERSION_1_9) {
    testCompile('org.testfx:testfx-core:4.0.12-alpha') {
        exclude group: 'org.testfx',
                module: 'testfx-internal-java8'
    }
    testRuntime 'org.testfx:testfx-internal-java9:4.0.12-alpha'
    testRuntime 'org.testfx:openjfx-monocle:jdk-9+181'
} else {
    testCompile 'org.testfx:testfx-core:4.0.12-alpha'
    testRuntime 'org.testfx:openjfx-monocle:8u76-b04'
}
Some General Advice
In this section I want to list some general advice that I can offer, based on my work developing the automated GUI test in VocabHunter. Firstly and most importantly, start your work with TestFX as early as possible in the project. You will find it much easier if you design and develop your application from the ground up with testing in mind than if you try to add it at a later date. You can then let your test grow as your project does, keeping the two perfectly in sync.
Secondly, include a headless version of your automated GUI test as a part of your standard build. Headless tests don’t “bother” the programmer by taking over the display when the build is run. Furthermore headless tests provide a great way to get more from your time investment by allowing the tests to run in your continuous integration system.
As a more general piece of advice, I would recommend taking a test-driven development approach to your work. For me, good unit tests are vital for ensuring software quality and automated GUI tests do not take away the need for unit testing. They should be seen as complementary. Often you get greater coverage with the GUI test but a unit test failure is usually far easier to analyse and fix than the corresponding failure in the GUI test. If you find yourself with a problem at both the unit test and the GUI test level, pick the unit test to begin your debugging as it is usually easier to isolate and fix the bug that way. Good unit testing also tends to promote loosely-coupled code and this is very helpful when it comes to developing the GUI test if you find that certain components need to be replaced with mocks for testing purposes.
Your GUI test should include a high percentage of the real system but don’t be afraid to use mocks to handle dependencies on external systems and to reduce the overall test complexity. Be pragmatic about your decisions here and think about what works best for your project. In the case of VocabHunter there is no database but lots of systems will have a database. Consider using in-memory databases such as H2 so that you can fully control your test. Make your test completely self-contained and predictable so that each time you run it you know that it will behave exactly the same way. Where there are problematic elements such as the database or external resources, look for alternatives such as mocking to use in the test.
Final Words
I can’t emphasise enough how useful the automated GUI test has been to me during my work on VocabHunter. The project is in active development and so the GUI test continues to be useful and is growing with the project. If you’d like to keep up with the all the latest developments, follow @vocabhunterapp on Twitter and of course fork the VocabHunter project on GitHub.
Finally, I would like to thank the authors of and contributors to the TestFX project. There are a wealth of great Open Source libraries out there and sometimes it is easy to forget that each such project came about as a result of the time and effort that individuals put into building great software to share with others. Well done and thanks to everyone who helped to make TestFX such a useful framework!
Related Articles
- Migrating to JUnit 5
- Installable Java Apps with jpackage
- Read (Almost) Any Document in Java
- Building a JavaFX Search Bar
- Dependency Injection in JavaFX
- How JavaFX was used to build a desktop application (King Tech Blog)
- VocabHunter – A tool for learners of foreign languages (King Tech Blog)
- Open Source & Secret Santa with Santulator (King Tech Blog)